


Setting up a survey where participants are randomly assigned into different conditions in REDCap can be a bit tricky. The purpose of randomization is in two-fold. Firstly, it ensures that different participants experience the experiment differently. For instance, in a survey you have 4 questions (Q1, Q2, Q3, Q4, Q5), you want some participants to answer questions Q1 and Q2, while others answer questions Q3 and Q4, and all the participants answer question Q5. The second purpose is to ensure that each participant gets an equal chance to belong to either group without you having any influence on the choice. This ensures that assignments into groups are not based on your bias.
In the following guide, I will help you set up randomization in REDCap. At least you should be familiar with the basic setup and will also need the help of your REDCap administrator.
Step One
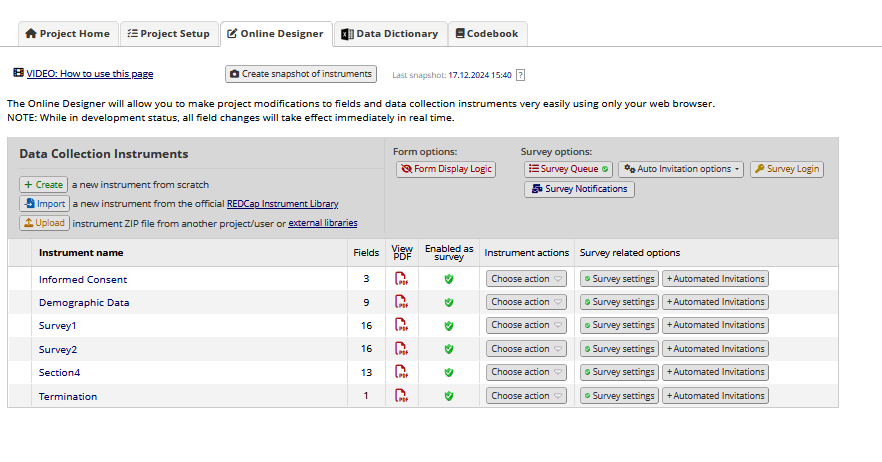
Set up your survey like the one below in Figure 1. Ensure that questions that will be answered by participants in the same condition are in the same instrument. Within the instruments, different sections are made up of different fields. In Figure 1, I have a survey where all participants will have to give their consent and fill in their demographics data. After that, some participants will answer questions in “Survey1”, while the other half will answer questions in “Survey2”. After that, all of them will answer questions in “Section 4”. The termination field is for participants who choose not to continue with the study, I will not talk much about this instrument in this guide.
Step Two
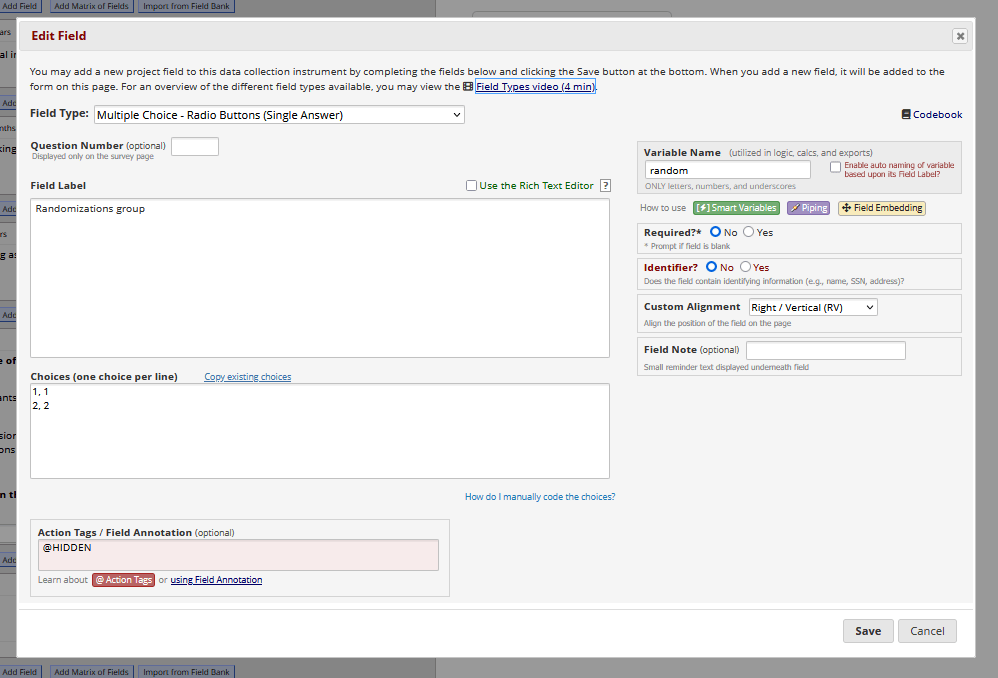
Choose an instrument where you want to set up the randomisation field. In my example, I will set up my randomisation field in the demographic data instrument. When you click the “Demographic Data” add a field to see the image in Figure 2, and in the edit field select the “Multiple choice – Radio Buttons (Single Answer)” field type. Name the field label and the Variable Name. Enter the number of conditions you want in the “Choices” section. In this case I have only two conditions, 1 and 2. In the action tag field select the “@HIDDEN” action tag and save. The action tag ensures that participants do not see this field. After that, you will see the field appearing like Figure 3.

Step Three
After that, you navigate to the Project Setup page on the top bar menu (label 1 in Figure 4). Activate the Randomization module in the “Enable optional modules and customizations” (label 2 in Figure 4). Depending on the rights of control you have, you may need the help of your administrator to activate this. We will return to the label 3 in Figure 4 later.

Step Four
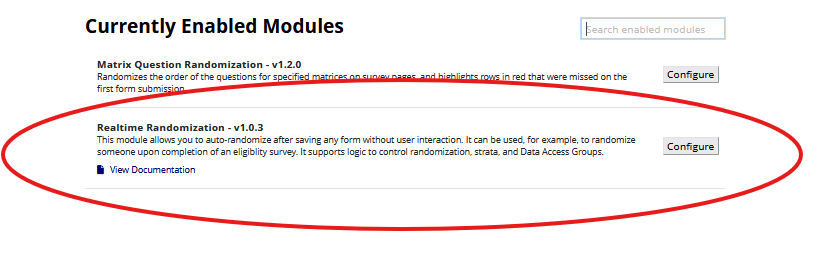
Now we have to install an external module called “Realtime Randomization – v1.0.3”. Inform your administrator to install this for you. This module ensures that your randomization is automatically activated without your influence. First, find the external module panel in the left panel, as seen in Figure 5. When you click on the manage button, you will see the list of external modules that have been installed. In this case, the module has been installed as seen in Figure 6. Click the configure button.

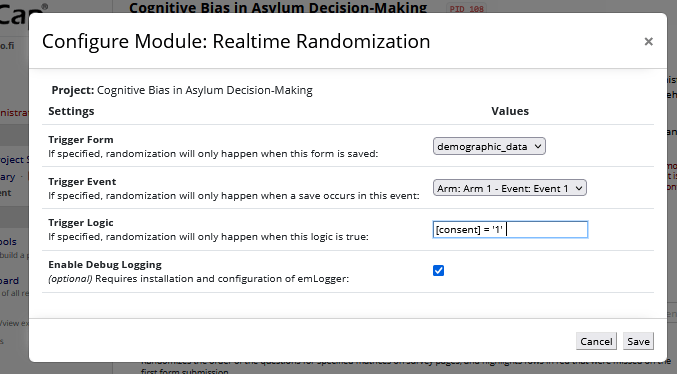
As seen in Figure 7, under the “Trigger form”, select the instrument where you set up the randomization field in Step Two above. In this case, I select the demographic data. With the “Trigger event” select “Arm: Arm 1 – Event: Event 1”. This section is more relevant when you are setting up a longitudinal study. In the case of cross-sectional design, you don’t need to worry about it. After that, you must set up the “Trigger logic”, this ensures that the randomization is done only after the condition is met. In this case, I have instructed that randomization is done only after the participants give consent. After completing the changes above, click “save” in the lower right corner.
Step Five
After that, you navigate to the Project Setup page on the top bar menu and click the “Set up a randomization” as seen in label 3 in Figure 4 above (Check Step Three). Here, you have to read the instruction and understand before proceeding. In this case, as seen in Figure 8, under “STEP 1”, I instruct REDCap how I want it to randomise participants into the conditions.
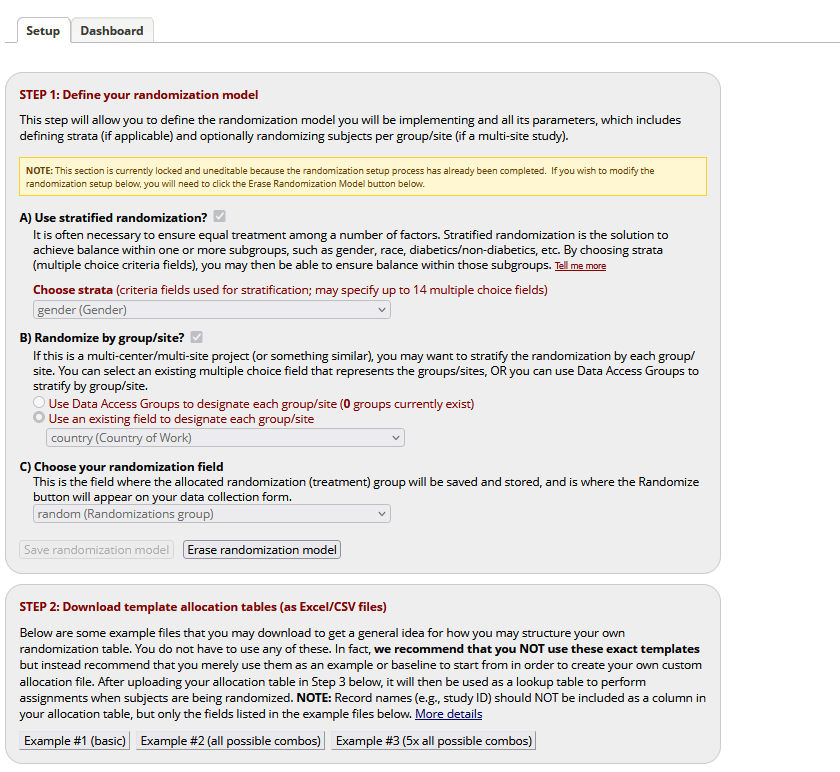
With section A as seen in Figure 8 above, I select gender as the variable I want to use for the randomization. This variable has four categories. With section B (you can ignore it), in my case, my study is being conducted across different countries, so I need to randomise that as well. In the section C, I select the randomization field I set up in Step Two above and then save it. With “STEP 2”, you have to download a randomization table. This is a bit technical, and you may need the help of a statistician or an IT person. You can follow an instruction by the UF clinical and translational science institute for a detailed understanding of how to use the table (click here for PDF). Basically, the table is going to tell Redcap that if participant 1 taking the survey is a male, assign him to group 1, if participant 2 taking the survey is a male, assign him to group 2, and so forth. What I do is I download the “Example #2 (all possible combos)”. This is an Excel sheet file. I open the file and copy the first two columns that have the combination of the allotments of participants into groups. I paste it into a new Excel sheet and reshuffle it. I reshuffle by generating random numbers on the third row using the “=RAND ()” function to fill up the empty rows. After that I sort the order of third row to reshuffle the first two columns. Then, I copy the reshuffled combination and paste it several times into the original table to replace the initial combination. I paste it several times depending on the number of participants and groups to be. If I paste it once, I have only one allotment. If I paste it 100 times, I will have 100 allotments for each combination. Do this until you have enough participants in each group. After setting the table. You can upload it under the “Development status” when you want to try out your survey (Figure 9). After that, you will upload it to “Production status” when your survey is ready for data collection.

Step Six
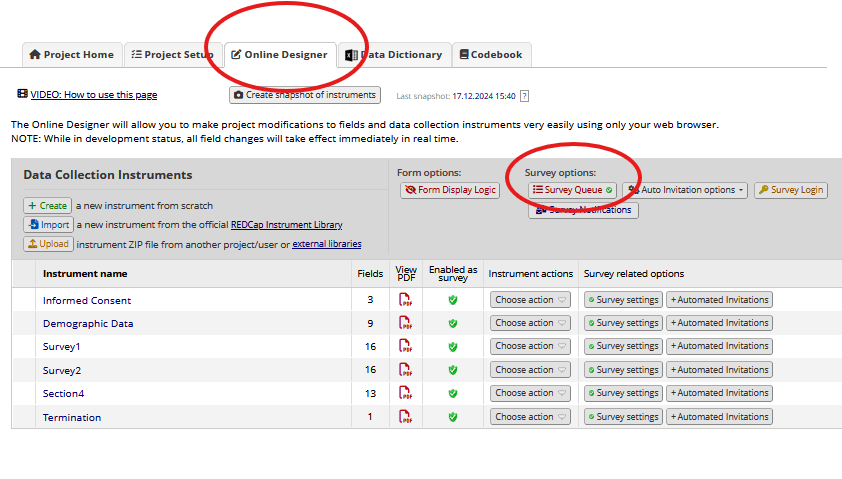
Return to the “Online Designer” and click the “Survey Queue” as seen in Figure 10. This is used for controlling how survey instruments appear to participants. This uses a combination of logics to display how the survey instruments appear to participants. Take note that this may interfere with other survey settings.
As seen in Figure 11 below, I have not activated the informed consent instrument because that is the link I will send to the participant. Under the demographic data instrument, I activate it and I tick the check box for “When the following survey is completed:” and specify that participants should complete the “informed consent” instrument before they can see this instrument. This is a drop-down menu so you can select what you want, but make sure the instrument for the condition of the logic comes before the current instrument. I further add another condition by selecting “AND” indicating that both conditions must be fulfilled and under the “When the following logic becomes true:” I tick the check box and specify that participants have to consent first. The “Auto start” check box ensures that the survey instruments appear to the participants automatically without them selecting it.
I move to the “Survey” (same as Survey1) instrument and repeat similar steps. Here I specify that participants can only see this instrument when they first complete the demographic data instrument and are assigned to group 1 in the randomization field we set up in Step Two. In “Survey_a” (same as Survey2), I specify that participants can only see this instrument when they first complete the demographic data instrument and are assigned to group 2 in the randomization field we set up in Step Two. This is where the randomization is done and the assignment into groups will be done automatically by REDCap. After that, in “Section4” I specify that participants can only see this when they either complete the “Survey” or “Survey_a” instrument. Take note that I use the “OR” operator so that when either condition is true before the instrument appears. This ensures that all participants see the instrument after their respective instruments. I used the [survey2_complete] = “2” logic to indicate that when participants complete that survey. To see what field to use for this logic, you have to first download the data file and see how the completed field is named in the file. The number 2 means completed, 1 means incomplete.
Here is where we come to the end of our tutorials. Try out your survey before you proceed to distribute it. Make sure you have enough groups in the table, otherwise, if the allotment table finishes, participants will not be assigned. Kindly send me an email if you need any further help.

Other Resources
- Randomization Module: https://www.ctsi.ufl.edu/files/2018/12/Setting-Up-the-Randomization-Module-in-REDCap.pdf
- Randomization Module: https://cri.uchicago.edu/wp-content/uploads/2020/02/REDCap-Randomization-Module.pdf
- Survey Queues: https://cri.uchicago.edu/wp-content/uploads/2015/12/REDCap-Survey-Queues.pdf
